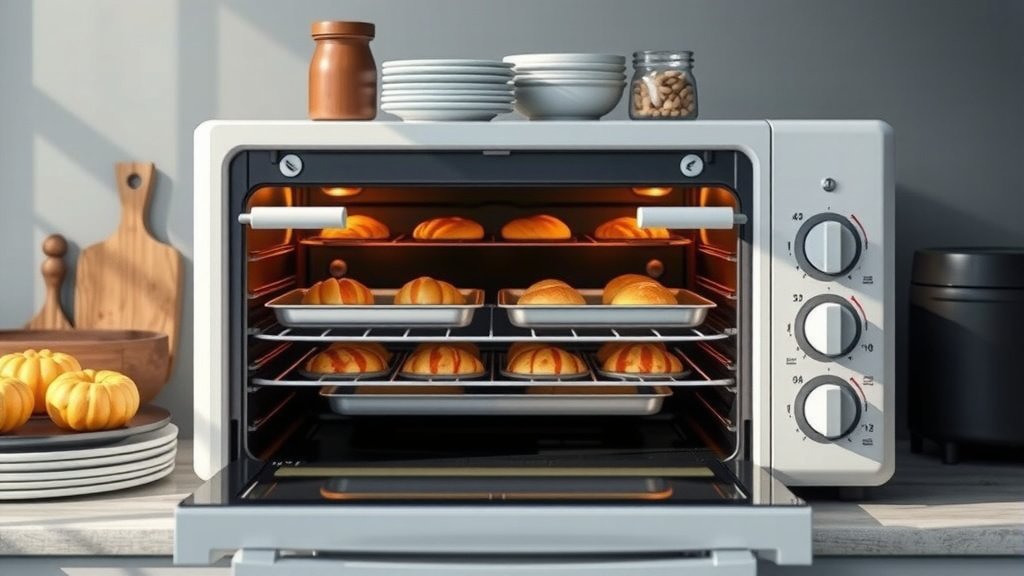
You can bake multiple trays in a single wall oven by carefully managing airflow, staggering your oven racks, and rotating your baking trays halfway through.
The key to baking multiple trays successfully involves understanding your oven’s hot spots and ensuring sufficient space around each item for even heat distribution.
Ready to master your single wall oven? Here’s the quick scoop:
- Always preheat your oven completely for stable temperatures.
- Stagger your baking trays on different racks, not directly above each other.
- Leave generous space around each tray for proper hot air circulation.
- Expect to increase your baking time a little compared to baking a single tray.
- Rotate and swap your trays halfway through baking for even browning.
How To Bake Multiple Trays In Single Wall Oven?
Baking multiple trays in a single wall oven is absolutely doable with a few smart strategies, focusing on optimal airflow and heat management.
Understanding Your Oven’s Hot Spots
Every oven has its own personality, complete with hotter and cooler areas. We found that most ovens have slightly warmer spots near the back or on one side (research shows this is common, culinary schools often teach this).
Knowing these quirks helps you anticipate how your food will bake. Pay attention during your first few multi-tray attempts.
Airflow is Your Best Friend
Imagine a bustling freeway for hot air. Your oven needs clear paths for that heat to circulate around your food. Poor airflow leads to uneven baking, with some items browning faster than others (experts at Good Housekeeping often discuss this).
This means giving your trays plenty of room. Don’t let them touch the oven walls or each other.
Choose the Right Trays and Racks
The type of baking sheet you use can impact heat distribution. Light-colored, heavy-gauge aluminum sheets are generally preferred for even baking.
Darker pans absorb more heat, which can cause faster browning. If you mix pan types, keep an eye on the darker ones.
Oven Rack Positioning Matters
Where you place your racks is important for how quickly your food cooks. The middle rack is usually the most balanced spot, receiving consistent heat from both the top and bottom elements.
When using multiple racks, it’s best to stagger them for improved airflow. For example, place one tray on the upper-middle rack and another on the lower-middle rack.
Don’t Overcrowd Your Oven
Think of your oven like a cozy living room. If it’s too packed, no one gets enough breathing room. Overcrowding blocks the flow of hot air, creating cool spots and uneven results.
Aim for at least an inch or two of space around each baking tray and the oven walls. This small gap makes a huge difference.
The Art of Staggering Your Baking
Staggering means placing your trays so they are not directly above one another. This allows heat to reach the top tray and still circulate around the bottom tray.
It’s like setting up a staircase for your trays instead of stacking them in a tower. This simple trick dramatically improves heat exposure for all items.
| Food Type | Ideal Rack Placement (Single Tray) | Multi-Tray Strategy |
|---|---|---|
| Cookies, Cakes | Middle Rack | Upper & Lower-Middle Racks, staggered |
| Roasts, Casseroles | Lower-Middle Rack | Lower-Middle & Middle Racks, staggered |
| Bread, Pizza | Lower Rack (for crispy bottom) | Middle & Lower Racks, staggered |
| Vegetables (roasting) | Middle or Upper-Middle | Upper & Lower-Middle Racks, staggered |
Managing Temperature Fluctuations
Opening your oven door frequently lets out heat, causing temperature drops. These drops can slow down baking and affect texture, especially for delicate items (many baking guides confirm this).
Try to resist peeking too often. Use your oven light and window if possible.
Preheating is Non-Negotiable
Always preheat your oven for at least 15-20 minutes after it signals it’s ready. This allows the oven walls and racks to absorb heat, creating a more stable environment (research by culinary institutions supports this).
A fully preheated oven ensures your food starts baking at the correct, consistent temperature from the very beginning.
The Golden Rule: Rotate and Swap
Even with careful staggering, your oven likely has warmer spots. This is where rotation becomes your secret weapon. Swapping tray positions helps everything bake evenly.
It’s like shuffling a deck of cards; everyone gets a turn in the best spot. This simple step prevents one tray from burning while another stays pale.
When to Rotate Your Trays
We found that rotating trays about halfway through the total baking time generally works well. For example, if your recipe calls for 30 minutes, rotate after 15 minutes.
When you rotate, move the back of the tray to the front, and if you have two trays, swap their rack positions. Top tray goes to bottom, bottom to top.
Monitor Your Food, Not Just the Timer
Recipes provide guidelines, but your eyes are your best tools. Baking multiple trays can extend cooking times, so the timer is just a suggestion.
Look for visual cues: golden-brown edges, bubbling, or a toothpick coming out clean. These signs tell you more than a clock.
Quick Checks Prevent Burnt Edges
A quick, decisive check of your food minimizes heat loss. If one tray is browning too fast, you might shield it with foil for the remaining time (this is a common trick used by professional bakers).
Don’t be afraid to make small adjustments during the baking process. Your oven isn’t a set-it-and-forget-it appliance, especially when multitasking.
Multi-Tray Baking Success Checklist
- Preheat oven completely.
- Use similar light-colored baking sheets.
- Stagger trays on different racks.
- Allow generous space around each tray.
- Rotate and swap trays halfway through.
- Add extra baking time if needed.
Common Mistakes to Avoid
One common pitfall is cramming too many trays into the oven. Resist the urge to add “just one more.” Quality over quantity wins here.
Another error is neglecting to rotate. Skipping this step often results in some items being undercooked or overcooked.
Also, don’t ignore your oven’s “ready” signal. Always give it extra time to truly heat up before adding your food.
Conclusion
Baking multiple trays in your single wall oven doesn’t have to be a baking dilemma. By focusing on airflow, strategic rack placement, careful monitoring, and timely rotation, you can achieve wonderfully even results.
With a little practice, you’ll feel like a kitchen wizard, efficiently turning out batches of delicious treats and meals without breaking a sweat. Happy baking!
How do I prevent my food from burning on the bottom when baking multiple trays?
To prevent burning on the bottom, use light-colored baking sheets and consider placing trays that are prone to browning on the upper-middle rack. You can also slide another empty baking sheet or a piece of foil directly underneath a tray that’s cooking too fast to shield it from direct bottom heat.
Should I adjust the oven temperature when baking multiple trays at once?
Generally, you don’t need to adjust the oven temperature, but you should expect an extended baking time. Many experts suggest adding 5-10 minutes (or more) to the total cook time when the oven is full, as the added food mass absorbs more heat.
Can I bake different types of food at the same time in a single oven?
Yes, you can, but choose foods that require similar oven temperatures and don’t impart strong odors to each other. For instance, baking cookies and roasting vegetables together might lead to savory cookies. Sweet and savory items are best baked separately, unless their flavors complement each other well.
What if my oven only has two usable racks? How can I maximize space?
Even with two racks, you can maximize space by staggering your trays diagonally. Place one tray on the far left of the upper rack and the other on the far right of the lower rack. Ensure generous space from the oven walls and rotate frequently for even baking.
Why are my baked goods still uneven even after rotating trays?
If your baked goods are still uneven after rotation, check if you’re overcrowding the oven, which restricts airflow. Also, ensure your oven is fully preheated for at least 15-20 minutes past the signal. An old or uncalibrated oven thermostat might also be a culprit, possibly needing professional inspection (oven repair specialists often advise this).