How to Use KitchenAid Stand Mixer Attachments
To use KitchenAid stand mixer attachments, fit the attachment to the front hub, lock it in place, and start on the lowest speed. Keep the mixer head locked, feed food slowly, and follow the attachment manual for speed and food size.
On this page (12 sections)
- How the mixer and hub work together
- How do you fit a KitchenAid attachment to the hub?
- Which KitchenAid attachments use the front hub?
- What speed should you use for each attachment?
- How do you feed food into an attachment safely?
- How do you use a dough hook attachment correctly?
- What prep tools help before you start an attachment?
- How do you clean and store attachments after use?
- Can a KitchenAid mixer run attachments safely every day?
- What mistakes should you avoid with KitchenAid attachments?
- How do you choose the right attachment for your kitchen?
- What is the simple routine for kitchenaid stand mixer attachments?
To use KitchenAid stand mixer attachments, fit the attachment to the front hub, lock it in place, and start on the lowest speed. This guide explains kitchenaid stand mixer how to use attachments step by step, with hub fit, speed choices, feeding tips, and cleaning.
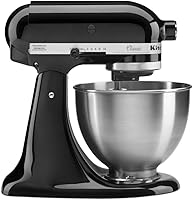
A good base mixer makes attachment work easier. The KitchenAid Artisan 5-Qt Tilt Head Stand Mixer in Almond Cream has a 5 quart stainless steel bowl and 10 speeds.
KitchenAid says the mixer has durable metal construction and 59 touchpoints around the bowl for mixing. It says the bowl can handle small or large batches, including 9 dozen cookies in a single batch using the flat beater.
How the mixer and hub work together
The tilt head lifts for bowl access, then locks down for mixing. The front hub sits above the bowl and drives attachments such as grinders, pasta makers, and slicers.
The mixer includes a pouring shield in its listed features. A shield helps reduce splashes when you add ingredients to the bowl during regular mixing.
How do you fit a KitchenAid attachment to the hub?
Slide the shaft into the front hub, tighten the knob, and check for a snug fit. Always turn the mixer off and unplug it first.
Remove the hub cover by loosening the knob and pulling it straight out. Keep it safe so it does not bend or get lost.
Line up the shaft with the hub opening and push it in until it seats. Tighten the knob by hand, without tools.
Wiggle the attachment gently. It should sit straight with no side to side play, so reseat it if it feels loose.
Run the mixer briefly on the slowest speed with no food, and stop at once if you hear grinding, rattling, or straining.
Which KitchenAid attachments use the front hub?
Most KitchenAid attachments drive from the same front hub. That shared hub lets one mixer grind, slice, shred, and shape food.
KitchenAid says the Artisan mixer works with over 10 optional hub powered attachments, sold separately. Examples include food grinders and pasta makers.
A food grinder suits home meat grinding and sausage making. It needs careful feeding and a clean area, because food moves fast once it reaches the auger.
A pasta maker suits flat sheets and cut noodles. Small portions and a steady pace help rollers pull dough through without tearing.
Shredders and slicers suit bulk vegetable prep. They replace hand grating, but still need firm, evenly sized pieces.
See best stand mixer attachments and accessories to compare types before you buy.
What speed should you use for each attachment?
Start on the lowest speed for almost every attachment.
Low speed gives control and reduces splatter, jamming, and strain on hub gears. High speed rarely helps and often makes feeding harder.
Grinders usually need the slowest setting. Feed small strips of cold meat, since warm meat smears and can clog the plate.
Pasta rollers also work best at low speed. Feed small dough pieces slowly, dust lightly with flour if allowed, and keep hands clear.
Slicers and shredders may run a step higher only when the manual says so. If pieces bounce in the chute, slow down.
Never change speed while food is jammed. Turn the mixer off, unplug it, and clear the blockage by hand.
How do you feed food into an attachment safely?
Feed food in small, steady portions and never push with your fingers. Use the pusher or tamper made for that chute.
Cut food to fit without force, using cold trimmed pieces for grinding and firm pieces with flat ends for slicing. Keep one hand on the pusher and the other away from the opening.
Stop if the attachment slows, shakes, or makes a new noise, and pause often to clear piles at the output. Work in short batches and rest the mixer between them.
For pasta, the best stand mixer pasta attachment guide helps match rollers and cutters to recipes, and use fresh dough unless the manual allows a dry mix.
How do you use a dough hook attachment correctly?
Use the dough hook for kneading, and hub attachments for shaping or cutting. These tools do different jobs, so order matters.
The dough hook fits on the beater shaft, not the front hub. For fitting and kneading steps, read using a KitchenAid dough hook.
Lower and lock the head, then start on the lowest or stir speed. Add flour and liquid in the recipe order.
Scrape the bowl with the mixer off, then lock the head again before restarting. Check the dough after a few minutes to make sure flour clears from the bottom.
Our best dough hook for mixer guide can help you pick a hook for your model, since hooks vary by coating, material, and bowl fit.
Gina Homolka and Heather K. Jones wrote Skinnytaste One and Done.
The book has 140 recipes, 120 full color photos, and nutrition info for each recipe.
It is organized by vessel, including Instant Pot, slow cooker, air fryer, sheet pan, skillet, and Dutch oven. That structure helps when you want one dinner with less cleanup.
What prep tools help before you start an attachment?
Measure and stage food before you fit the attachment. Once the mixer runs, your hands should stay focused on feeding and guiding.
The OXO Good Grips Angled Measuring Cup holds 2 cups. Its patented angled surface lets you read measurements from above, so you do not need to lift and level at eye height.
The cup has standard and metric markings, a soft non slip handle, and a generous spout. It is BPA free plastic and top rack dishwasher safe, according to OXO.
That angled view helps with pasta dough hydration, marinades, and grinding mixtures. You can check the level while the cup sits on the counter.
Other prep tools that help include a rimmed tray for staging cut pieces, a bench scraper for dough, and a clean towel for hands. Keep the stage close to the mixer so you do not reach across the hub.
How do you clean and store attachments after use?
Wash, dry, and store each part as its manual states. Prompt cleaning prevents dried food from bonding to rollers, plates, and cutting edges.
Turn the mixer off and unplug it before you remove the attachment. Loosen the hub knob and pull the attachment straight out.
Disassemble the attachment into its separate parts. Remove plates, cutters, rollers, and end caps so you can wash each surface fully.
Check the manual for dishwasher rules. Some parts are hand wash only, while some metal parts may allow top rack washing, so hand wash and dry at once when in doubt.
Dry parts well before storage, since damp rollers can spot or rust. Store parts in a dry cabinet, not stacked under heavy pans.
Can a KitchenAid mixer run attachments safely every day?
Yes, when you follow speed limits, feed slowly, and stop for jams. Daily use works best with small batches and clean parts.
The Artisan mixer has 10 speeds, from stir to whipping, and KitchenAid says speed 8 suits whipping cream. For attachments, low speed is the safe default.
Stop at once if you see smoke, smell burning, or hear strain. Unplug the mixer, let it cool, and check for a blockage or wrong part.
KitchenAid backs this mixer with a 1 year hassle free replacement warranty, and our best KitchenAid stand mixer cover guide covers dust protection and fit.
What mistakes should you avoid with KitchenAid attachments?
Avoid high speeds, forced feeding, and wrong food sizes. Most attachment problems come from one of those three habits.
Do not use the highest speed because it seems faster, as grinders and pasta rollers need control. Do not push food with your fingers, use a pusher, and cut food smaller if it does not fit.
Do not use hot, soft, or bone in food where the manual calls for cold firm pieces, since warm meat smears and soft vegetables can jam a slicer. Do not run the mixer with a loose attachment or tilt the head while an attachment is running.
See best KitchenAid stand mixer attachments to match add ons to the jobs you actually do.
How do you choose the right attachment for your kitchen?
Choose the attachment that matches the food you prep most often. A pasta maker suits fresh dough fans, while a grinder suits meat prep fans.
List your top three foods first. If you make pasta monthly, a roller or cutter earns its space, and if you prep slaw weekly, a shredder earns its space.
Check fit for your mixer model before you buy, since some attachments fit tilt head models, some fit bowl lift models, and some need a specific adapter.
Measure storage space before adding parts, as long shafts, rollers, and plates need room to store dry and clean. Consider cleanup time as well as prep time, since grinders and pasta rollers need washing and drying after each use.
A reader question about another hub tool is covered in How To Use A Rotisserie Basket Attachment?, and that guide uses the same fit first rule even though the oven hub works differently. Another fit question is covered in Do You Need a Special Stand for a Pizza Oven?, so check fit and support before lifting or loading heavy parts.
What is the simple routine for kitchenaid stand mixer attachments?
Unplug, fit, lock, feed slowly, stop, clean, and dry. That routine covers most hub attachments and keeps the mixer ready for the next batch.
Use the Artisan mixer for bowl work, then switch to the hub for grinding, slicing, or pasta. Keep the measuring cup and staged tray within reach.
Pick the best KitchenAid stand mixer attachments list for more options to compare. Pick a dough hook guide if kneading is your main job.
Pick a cover guide if dust and storage are your main concern. A clean, dry mixer with a snug hub fit runs with less noise and strain.
That order, fit first and speed last, is the core rule for kitchenaid stand mixer how to use attachments in daily cooking.
Frequently asked questions
How do I fit a KitchenAid attachment to the mixer?
Turn the mixer off and unplug it, remove the hub cover, slide the attachment shaft into the hub, and tighten the hub knob. Check that the attachment sits straight and does not wiggle.
Run the mixer briefly on the slowest speed before adding food.
What speed should I use for KitchenAid attachments?
Start on the lowest speed and follow the attachment manual. Many attachments work best at low speeds, while a few allow a slightly higher setting.
Never guess a high speed for grinding or pasta making.
Can I put KitchenAid attachments in the dishwasher?
Check the manual for each part, since some pieces are hand wash only. Wash metal parts promptly, dry them well, and store them where they will not get damp.
Avoid harsh soaking that can dull or stain parts.