How to Grease a KitchenAid Stand Mixer
To grease a KitchenAid stand mixer, unplug it, remove the head screws, clean old grease from the gears, and spread a thin layer of food-safe gear grease before you reassemble it. Check the manual for your exact model first, and stop for professional help if parts look bent or cracked.
On this page (11 sections)
- How do you know a stand mixer needs grease?
- What tools and grease do you need first?
- How to grease KitchenAid stand mixer gears step by step
- Why does grease matter for tilt-head and bowl-lift models?
- What should you do if you do not own a KitchenAid?
- How do you clean old grease without damaging parts?
- How often should you grease a stand mixer?
- What mistakes cause grease leaks or new noise?
- When should you get professional help instead?
- Which mixer suits your baking style before you grease it?
- How to grease a KitchenAid stand mixer without making a mess
To grease a KitchenAid stand mixer, unplug it, remove the head screws, clean old grease from the gears, and spread a thin layer of food-safe gear grease before you reassemble it. Check the manual for your exact model first, and stop for professional help if parts look bent or cracked.
This guide covers the signs, tools, and safe steps for greasing KitchenAid gears at home. It also explains cleaning, timing, and when to stop.
How do you know a stand mixer needs grease?
A mixer needs grease when it sounds louder, feels warmer, or the grease looks dark or clumpy.
Listen for a dry whine at low speeds. A healthy mixer has a steady hum, not grinding or squealing that changes with the load.
Feel the head after a short run. Warmth during kneading is normal, but fast heat on a small batch can signal rising friction.
Old grease often looks gray, brown, or stringy, and a burnt or metallic smell is also a reason to stop and check.
What tools and grease do you need first?
You need food-safe gear grease, a screwdriver set, a small scraper, and clean cloths.
Choose grease labeled for stand mixers or appliance gears. The tub should say food-safe or food-grade, since grease can come near the bowl and attachments.
Avoid petroleum jelly, cooking oils, and butter. They can thin with heat, move away from the teeth, and create a mess around the bowl area.
A plastic scraper or old toothbrush works for removing old grease. Avoid wire brushes on coated parts, since scratches can invite rust or food buildup.
How to grease KitchenAid stand mixer gears step by step
The safe order is unplug, remove the head, clean old grease, add new grease, and test empty before you bake.
Work on a clean counter so screws do not roll away.
Step 1: Unplug and prepare the mixer
Unplug the mixer and press the speed lever to off. Remove the bowl, beater, and any attachment, and set them aside.
Tilt the head back if your model allows it, and lock it as the manual describes. If it does not lock, support it with one hand while you work.
Wipe the outside with a damp cloth. This keeps crumbs and flour from falling into the gear case while it is open.
Step 2: Remove the head cover and screws
Find the screws on your model. Tilt-head models often have screws under the head cover or at the back of the cover plate.
Keep each screw in a line in the order you remove it. That order helps you refit the cover without cross-threading the holes.
Lift the cover straight up rather than prying it sideways. If it sticks, stop and check for one more screw before you force it.
Step 3: Clean the old grease from the gears
Scrape out old grease until the gear teeth look clean and you can see their shape.
Use a plastic scraper for large clumps and a cloth for the rest. Wipe the gear case, the cover, and the screw posts.
If the grease looks gritty, wipe the gears again. Grit left in the case can act like sandpaper on the teeth.
Step 4: Spread a thin layer of new grease
Put a pea-sized amount of new grease on the main gear first. Spread it with a brush or gloved fingertip so the teeth are coated, not flooded.
Add a small amount to the smaller pinion gear. The goal is a thin, even coat that stays in place when the head moves.
Do not fill the whole case to the top. Extra grease can squeeze out onto the counter, the bowl, or the beater shaft.
Step 5: Reassemble and test the mixer
Put screws back in the same order you removed them. Tighten until snug, and do not force a screw that will not turn.
Run the mixer empty at low speed for 30 seconds. Listen for steady sound and check for leaks around the cover.
If grease appears at the seam, wipe it and check whether you added too much. If a new noise starts, stop and recheck the cover and gear alignment.
Why does grease matter for tilt-head and bowl-lift models?
Grease matters because the gears carry every mixing load.
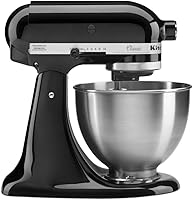
Tilt-head models like the KitchenAid Classic Series 4.5 Quart Tilt-Head Stand let you add ingredients with better access to the bowl. See KitchenAid mixer attachments for setup and use.
Its 4.5-quart stainless steel bowl holds up to 8 dozen cookies with the flat beater. The KitchenAid Artisan has a 5-quart bowl for up to 9 dozen cookies using 28-gram dough pieces and 10 speeds.
A stand mixer guide can help you match bowl size to your habits.
What should you do if you do not own a KitchenAid?
If you use a hand mixer, you do not grease gears the same way.
A hand mixer has a sealed motor housing, so cleaning and storage matter more than gear grease. Compare it with a stand mixer vs hand mixer before choosing a mixer type.
The Hamilton Beach 6-Speed Electric Hand Mixer With QuickBurst and Bowl Rest has 6 speeds plus a QuickBurst button and a Bowl Rest that stabilizes it on the bowl edge. Our best stand mixer for baking guide compares bowl sizes and speeds if you are shopping.
How do you clean old grease without damaging parts?
Use a plastic scraper, a soft cloth, and a little warm water on outside parts.
Remove large clumps with the scraper in small strokes. Avoid digging into coated metal or plastic gear teeth.
Wipe the case until no black or gray residue comes off. If residue remains, add a little new grease, turn the gears by hand, then wipe again.
Do not soak the head in water or use oven cleaner, as products for how to remove baked-on grease from an oven are too strong for gears and coatings.
How often should you grease a stand mixer?
Most home bakers grease a mixer every 6 to 12 months, or sooner after heavy dough use.
If you make bread weekly, check the gears twice a year. Kneading stiff dough wears grease faster than whipping cream or mixing batter.
If you bake only a few times a month, once a year may be enough. Still check for dark grease or new noise before a big baking day.
Watch for grease that looks thin and runny, since that change often means heat has broken it down. Keep a simple note of the date and the grease you used.
What mistakes cause grease leaks or new noise?
Overfilling the gear case is the most common cause of leaks.
Another mistake is tightening screws unevenly. A crooked cover can leave a gap, even if the grease amount is right.
Forcing a cover off can bend a tab or crack plastic. If the cover will not lift, look for a hidden screw or a locking tab instead of prying harder.
Running the mixer with the head open can throw grease everywhere, so test with the cover in place and the bowl removed. If you hear grinding after greasing, stop and recheck the cover and gear alignment.
When should you get professional help instead?
Get help if you see cracked gears, bent shafts, frayed cords, or screws that will not tighten.
Also stop if the mixer trips a breaker, sparks, or smells burnt. Unplug it and do not run it again until a qualified technician checks it.
If you are unsure which screws to remove, check the manual first. For everyday use, our kitchenaid stand mixer how to use guide covers speeds, bowls, and attachments.
If you plan to use hub attachments often, read about best kitchenaid stand mixer attachments before you buy and follow the load limits.
Which mixer suits your baking style before you grease it?
Choose by batch size and how often you knead dough.
The KitchenAid Classic Series 4.5 Quart Tilt-Head Stand has 10 speeds and includes a coated flat beater, coated dough hook, and 6-wire whip. That set covers mixing, kneading, and whipping without extra purchases.
The KitchenAid Artisan 5-Qt Tilt Head Stand Mixer has a 5-quart bowl and 10 speeds for bigger batches. It suits bakers who often make double batches or bread dough.
The Hamilton Beach hand mixer suits small jobs like whipped cream, batters, and folding in nuts or chocolate chips. Its 250-watt peak-power motor and QuickBurst button help with short bursts of power.
If you are comparing prices, our best stand mixer on sale page tracks current deals. If you need a larger lifting design, see best stand mixer bowl lift for models that raise the bowl instead of tilting the head.
If your mixer sits on a cart or shelf, check do you need a special stand for a pizza oven only if you also use outdoor or pizza ovens. That guide covers oven stands, not mixer stands.
How to grease a KitchenAid stand mixer without making a mess
Work slowly, use less grease than you think, and test the mixer empty before you bake.
Keep a cloth under the head while you scrape out old grease. It catches drips before they reach the counter or base.
Add grease in thin layers and turn the gears by hand between coats. You will see coverage better and avoid overfilling the case.
After you reassemble the head, wipe the seam so a leak is easier to spot during the test run. If the gears look damaged or the mixer still sounds wrong, professional help is safer.
Frequently asked questions
How often should you grease a KitchenAid stand mixer?
KitchenAid does not publish one interval for every model, so check your manual first. Many owners grease every 6 to 12 months with regular use, or sooner if the mixer sounds dry, runs hot, or the grease looks dark and thin.
What grease should you use in a KitchenAid stand mixer?
Use a food-safe gear grease made for stand mixers, often sold as white lithium or mixer grease by the brand. Avoid petroleum jelly, cooking oil, and automotive grease, since they can thin, leak, or contaminate food-contact parts.
Can you use coconut oil or vegetable oil on mixer gears?
No, cooking oils are not a safe substitute for gear grease. They can thin with heat, migrate into the bowl, and leave the gears dry.
Use a grease rated for appliance gears and food-safe use.
What should you avoid when you grease a stand mixer?
Avoid overfilling the gear case, forcing screws, or running the mixer with the head open. Keep old grease out of the bowl, avoid abrasive tools on metal gears, and stop if you see cracked plastic parts or worn teeth.