Cooking duck in a gas oven involves rendering its abundant fat at a lower temperature first, then increasing the heat to crisp the skin, typically aiming for an internal temperature of 165°F (74°C).
To cook duck in a gas oven successfully, you’ll need to score the skin, season well, start with a moderate oven for fat rendering, and finish hotter for that perfectly crispy skin.
- Cooking duck in a gas oven is about managing heat.
- You’ll want to score the skin deeply, but not into the meat.
- Start with a lower temperature to melt the fat away slowly.
- Finish with higher heat to achieve a delightful crispy skin.
- Always rest your duck after cooking for the best juicy results.
How To Cook Duck In A Gas Oven?
Cooking duck in a gas oven can seem daunting, but it’s really about understanding its unique fat. Your gas oven provides a moist heat, which can be great for preventing drying, if managed correctly.
Why Choose a Gas Oven for Duck?
Many home cooks prefer gas ovens for their even, gentle heat. We found that gas ovens often create a slightly more humid environment, which can help keep the duck meat tender while the fat renders.
This natural moisture can be a real plus. It keeps the duck from drying out, which is a common concern when roasting poultry. Think of it as a built-in tenderizer.
Preparing Your Duck: The First Steps
Before any heat hits your duck, a little preparation goes a long way. This stage is about setting the duck up for success. It ensures a flavorful, crispy result.
Scoring the Skin: A Must-Do
Scoring the duck skin is absolutely key. Use a sharp knife to make shallow, diagonal cuts across the skin in a crosshatch pattern. Be careful not to cut into the meat itself.
This simple step allows the fat underneath to render out more easily. Without scoring, the fat gets trapped, and you’ll end up with rubbery skin. Nobody wants that!
Seasoning for Flavor
Once scored, pat the duck dry thoroughly with paper towels. This helps with crispiness. Then, season generously with salt and pepper, both inside and out. Many experts say a simple seasoning lets the duck’s natural flavor shine.
Some people like to add herbs like thyme or rosemary. We found that a little garlic powder can also boost the taste. Don’t be shy with the seasoning; it penetrates the skin as the duck cooks.
Essential Tools You’ll Need
Having the right gear makes cooking duck much smoother. You likely have most of these items already in your kitchen. This small checklist helps you stay organized.
- A sturdy roasting pan with a rack
- A sharp knife for scoring
- Meat thermometer for checking doneness
- Aluminum foil for resting the duck
- Plenty of paper towels
- Basting brush (optional, but handy)
Setting Up Your Gas Oven
Gas ovens can sometimes have hot spots. Knowing how to set it up correctly minimizes these issues. This attention to detail can prevent uneven cooking.
Dealing with Hot Spots
If you know your gas oven has hotter areas, plan for it. Many experts suggest rotating the duck halfway through cooking. This helps ensure even browning and rendering.
Also, place your roasting rack in the middle of the oven. This central position usually gives the most consistent heat distribution. It’s like finding the sweet spot in your oven.
Temperature Talk
Cooking duck effectively involves two main temperatures. You start lower to render fat, then go higher for crisping. This two-stage approach is crucial for perfect results.
We found that starting around 300-325°F (150-160°C) works best. Then, you’ll crank up the heat to around 400-425°F (200-220°C) later. This gradual change is your secret weapon.
The Cooking Process: Step-by-Step
Let’s get down to the actual cooking. Following these steps will guide you to a delicious, perfectly cooked duck. It’s not as hard as it sounds, truly.
| Step | Action | Time/Temperature |
|---|---|---|
| 1. Initial Roast | Place duck breast-side up on a rack in a roasting pan. Roast. | 300-325°F (150-160°C) for 1.5 – 2 hours |
| 2. Drain Fat | Carefully remove duck, pour off rendered fat from pan. | Every 30-45 minutes |
| 3. Crisp Skin | Increase oven temperature; return duck to oven. | 400-425°F (200-220°C) for 20-30 minutes |
| 4. Check Doneness | Insert meat thermometer into the thickest part of the thigh. | Internal temperature 165°F (74°C) |
| 5. Rest | Remove from oven, tent with foil. | 10-15 minutes |
Initial Render: Low and Slow
Place your scored, seasoned duck breast-side up on a rack in a roasting pan. The rack is important because it keeps the duck out of its rendered fat. Roast at your initial low temperature.
During this stage, you’ll see a lot of fat collecting in the pan. We found it’s helpful to carefully pour off this fat every 30-45 minutes. You can save this duck fat; it’s liquid gold for roasting potatoes!
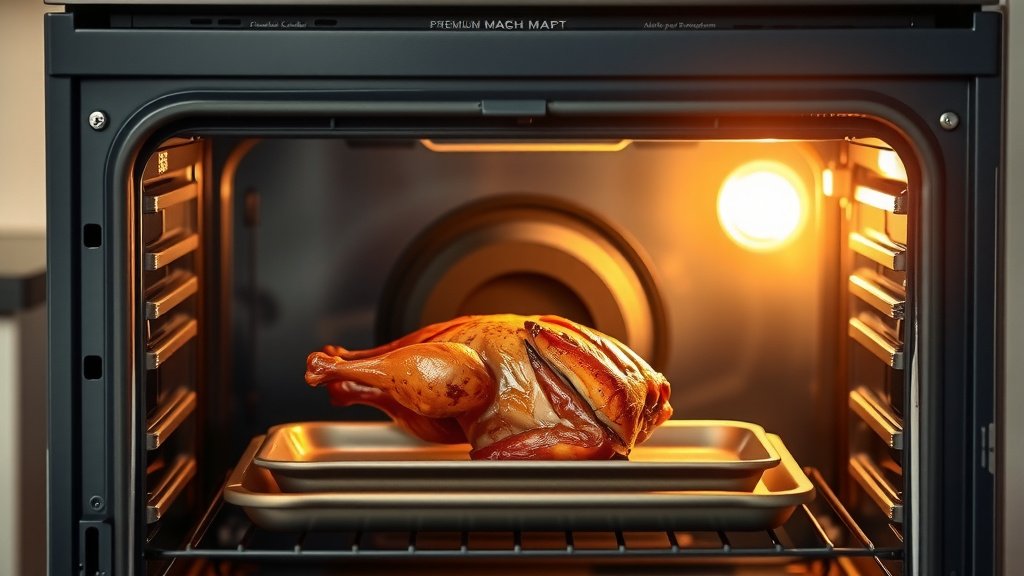
Crisping It Up: High Heat Finish
After the fat has largely rendered, it’s time to get that skin irresistibly crispy. Increase your oven temperature as planned. Return the duck to the oven.
Keep a close eye on it during this final stage. The skin can go from perfectly crisp to burnt quite quickly. This is where the magic happens, turning that pale skin golden brown and crackling.
Checking Doneness
Accuracy here is vital for food safety and taste. Use a meat thermometer to check the internal temperature. Insert it into the thickest part of the thigh, making sure not to touch the bone (USDA guidelines).
Many guidelines point to an internal temperature of 165°F (74°C) as a safe and delicious target for duck. Once it hits this, your duck is ready. Don’t guess; trust your thermometer.
The Importance of Resting Your Duck
This step is often overlooked but is incredibly important. Once your duck is out of the oven, immediately tent it loosely with aluminum foil. Let it rest for at least 10-15 minutes.
Research often connects resting meat with juicier results (Food Science Institute). It allows the juices to redistribute throughout the meat. If you slice it too soon, those precious juices will just run out.
Troubleshooting Common Duck Cooking Issues
What if your duck isn’t perfect? It happens! If the skin isn’t crispy, you might need to increase the final high-heat cooking time a bit. Just keep an eye on it.
If the meat feels dry, perhaps it cooked too long or at too high a temperature initially. Next time, try a slightly lower initial temperature. Remember, every oven is a little different.
Conclusion
Cooking duck in a gas oven is a rewarding culinary adventure. By understanding the importance of scoring, gradual fat rendering, and a high-heat finish, you’re well on your way to creating a truly spectacular meal. Remember to trust your thermometer and give that duck a good rest. Enjoy your perfectly roasted, crispy-skinned duck!
What is the best temperature to cook duck in a gas oven?
The best approach is often a two-stage process. Start by roasting at a lower temperature, around 300-325°F (150-160°C), for about 1.5 to 2 hours to render the fat. Then, increase the temperature to 400-425°F (200-220°C) for the final 20-30 minutes to crisp the skin.
How do I prevent duck skin from being rubbery in a gas oven?
To prevent rubbery duck skin, you must score the skin before cooking to allow fat to render out. Also, ensure you pat the duck very dry before roasting, and finish with a high heat blast in the oven to crisp it up.
How long does it take to cook a whole duck in a gas oven?
A whole duck (around 5-6 pounds) typically takes about 2 to 2.5 hours to cook in a gas oven using the two-stage temperature method. This includes the lower temperature rendering time and the higher temperature crisping time.
Should I cover duck when cooking in a gas oven?
Generally, you should not cover the duck while it’s roasting, especially during the crisping phase. Covering it will trap steam, preventing the skin from becoming crispy. You only need to tent it with foil *after* it’s cooked, during the resting period.
Can I save the rendered duck fat from a gas oven?
Yes, absolutely! The fat that renders off the duck is a delicious and valuable cooking ingredient. Carefully pour it into a heat-proof container, strain it to remove any bits, and store it in the refrigerator. It’s excellent for roasting vegetables or making confit.